
In This Article
If you’ve ever unpacked a hammock, looked at two trees or a stand, and wondered whether the straps are actually in the right position, you’re not alone. How do you set up a hammock is one of those questions that sounds simple until you’re standing outside with a hammock, two suspension straps, and no idea whether the fabric should be tight, loose, high, or almost touching the ground. The good news is that hammock setup becomes much easier once you understand the basic relationship between suspension points, hammock sag, attachment height, and the weight the system needs to support.
A properly installed hammock should feel relaxed rather than stretched completely tight. The suspension system needs to be securely attached to suitable anchor points, while the hammock itself should have enough sag to create a comfortable lying position. Getting this balance right is more important than simply hanging the hammock as high as possible. A setup that looks secure can still be uncomfortable or unsafe if the suspension points are weak, the straps are poorly positioned, or the hammock is installed too close to the ground.
This guide breaks down how do you set up a hammock using seven practical hammock and suspension options, from simple tree straps and portable hammocks to freestanding hammock stands. You’ll see how each approach works, what kind of user it suits, and what details matter when you’re setting everything up for the first time.
We’ll also cover spacing, suspension height, hammock sag, real-world setup situations, common installation mistakes, long-term maintenance, safety considerations, and the questions beginners most often ask. By the end, you’ll have a clear process for setting up a hammock comfortably without relying on guesswork every time you move it.
Disclosure: This post contains affiliate links. As an Amazon Associate, I earn from qualifying purchases made through these links, at no additional cost to you.
Quick Comparison: Hammock Setup Options at a Glance
| Hammock Setup Option | Typical Price Range | Best For | Setup Difficulty |
|---|---|---|---|
| ENO SingleNest Hammock | Around $50–$70 | Solo camping and travel | Easy |
| Wise Owl Outfitters Hammock | Around $30–$45 | Beginners and casual use | Very Easy |
| Vivere Double Cotton Hammock | Around $60–$100 | Backyard relaxation | Easy |
| Sunyear Portable Hammock | Around $25–$40 | Budget outdoor use | Very Easy |
| Bear Butt Double Hammock | Around $40–$60 | Two-person lounging | Easy |
| Best Choice Products Hammock with Stand | Around $100–$150 | No-tree setups | Easy |
| Vivere Universal Steel Stand | Around $100–$150 | Flexible backyard placement | Easy |
Looking at the options above, a portable hammock with tree straps is generally the simplest answer when you already have two suitable anchor points. The setup is fast, the equipment packs down easily, and you can move the hammock whenever you change locations. For a backyard where suitable trees are unavailable, a freestanding hammock stand is the more practical solution because you don’t have to modify or rely on existing structures.
The important thing is not to choose a hammock solely by its fabric or appearance. How do you set up a hammock successfully depends just as much on the suspension system as the hammock itself. A good hammock with poor straps can be more frustrating than an inexpensive hammock with a straightforward suspension system.
💬 Bookmark this comparison so you can come back to it when choosing your hammock setup — it can save you from buying the wrong suspension system! 😊
Top 7 Hammock Setup Options: Expert Analysis
1. ENO SingleNest Hammock — lightweight setup for solo outdoor use
ENO SingleNest Hammock is a strong choice for people who want a straightforward answer to the question how do you set up a hammock when portability matters. Its single-person design is compact enough for camping, hiking, travel, and spontaneous relaxation, while the simple suspension concept makes it relatively easy for beginners to understand.
The biggest advantage of a lightweight hammock is that there is less equipment to manage. Instead of dealing with a bulky frame, you can use appropriate tree straps or suspension systems to connect the hammock between two suitable anchor points. This makes the setup particularly useful when you’re camping somewhere that already provides appropriate trees.
The key is learning not to pull the hammock completely tight. Beginners often assume a hammock should resemble a tightly stretched piece of fabric between two trees. In reality, allowing a noticeable amount of sag helps distribute your weight and creates a more comfortable sleeping or lounging position.
The SingleNest format also works well for people who frequently move their hammock. You can set it up in one location, relax, then pack it away without leaving a permanent structure behind. This makes it a practical option for campsites, parks where hammock use is permitted, and backyard users who don’t want a fixed installation.
For a first hammock, the relatively uncomplicated design makes the setup process less intimidating. Once you understand strap positioning, suspension height, and proper sag, you can apply the same principles to many other portable hammocks.
At around $50–$70 depending on configuration and suspension accessories, the ENO SingleNest is a practical option for users prioritizing portability and straightforward setup.
2. Wise Owl Outfitters Hammock — beginner-friendly setup on a budget
Wise Owl Outfitters Hammock is aimed at users who want a simple hammock experience without spending heavily on specialized equipment. Its appeal is especially strong for beginners because a basic portable hammock makes it easier to learn the fundamentals of suspension without having to assemble a large frame.
When figuring out how do you set up a hammock, the first challenge is usually identifying suitable anchor points. With a portable hammock, the two anchor points should be strong enough to support the intended load and positioned far enough apart to allow the hammock to form a comfortable curve. Tree-friendly straps are preferable to improvised ropes that can damage bark or slip unexpectedly.
Once the suspension points are secured, attach the hammock according to the manufacturer’s instructions and adjust the height gradually. You don’t need to achieve perfect positioning on the first attempt. A useful approach is to start slightly lower than you think necessary, sit gently in the hammock, and then make small adjustments.
The Wise Owl style of setup is particularly convenient for casual backyard use because you can take the hammock down when you finish. That also reduces exposure to weather when the hammock is not being used.
The main limitation of budget hammocks is that the suspension accessories included in a package can vary, so you should verify exactly what comes with the product before assuming you have everything required. The hammock fabric, straps, carabiners, and weight rating should all be checked separately.
For users learning the basics, however, this type of hammock provides an inexpensive way to practice proper setup technique before investing in a more specialized camping or backyard system.
3. Vivere Double Cotton Hammock — comfortable backyard setup for two
Vivere Double Cotton Hammock takes the hammock concept in a more relaxed backyard direction. Its larger surface is designed for people who want room to stretch out, and the double-hammock format can make it appealing for couples or anyone who prefers extra lounging space.
The question how do you set up a hammock becomes slightly different with a larger hammock because the additional fabric and potential load make proper suspension even more important. The attachment points need to be stable, the suspension hardware needs to be rated appropriately, and the hammock should be tested gradually rather than immediately loaded with full body weight.
A backyard hammock is also more likely to remain installed for extended periods, which means environmental exposure becomes part of the setup equation. If the hammock will stay outdoors, consider whether the fabric and hardware are appropriate for weather exposure and whether you should bring the hammock indoors during storms or prolonged periods of poor weather.
One advantage of a larger cotton hammock is comfort. The additional fabric can allow you to lie diagonally, which spreads the material beneath your body and creates a flatter resting position than simply lying straight down the center.
For installation between trees, use purpose-designed straps that distribute pressure across the tree rather than thin rope wrapped repeatedly around the trunk. If you use a stand, verify the stand dimensions and compatibility before attaching the hammock.
At around $60–$100 depending on the configuration, this is more of a backyard relaxation solution than a minimalist camping hammock.
4. Sunyear Portable Hammock — simple and inexpensive tree setup
Sunyear Portable Hammock is suited to users who want an inexpensive way to experiment with hammock camping or casual outdoor lounging. Its portable design makes it easy to carry, and the basic suspension approach means the setup can be completed without complicated hardware.
When learning how do you set up a hammock, one of the most useful habits is to inspect every component before putting weight on it. Check the straps for fraying, inspect carabiners for damage, and look carefully at the trees or other anchor points. A hammock is only as reliable as the weakest part of its suspension system.
Once the straps are attached, adjust them so the hammock hangs at a comfortable height. The center should not be extremely high off the ground because the hammock naturally drops when loaded. Starting too high creates an unnecessary fall hazard if you sit down before testing the suspension.
Portable hammocks are particularly useful for travel because you can change locations without committing to a permanent setup. They can also be useful around campgrounds where fixed structures are unavailable.
The biggest attraction is price. At around $25–$40, a basic portable hammock is inexpensive enough for a first experiment. However, budget shoppers should pay close attention to stated weight limits and included hardware rather than assuming all hammock systems are interchangeable.
This option works best for casual users who want a lightweight hammock without the complexity of a large stand or permanent backyard installation.
5. Bear Butt Double Hammock — spacious setup for shared lounging
Bear Butt Double Hammock is designed around the idea that hammock time doesn’t necessarily have to be a solo activity. The larger surface provides additional room for two people or simply gives a single user more space to move around.
When asking how do you set up a hammock for two people, load distribution becomes particularly important. Two people moving independently can create much more dynamic force than one person lying still. The suspension points and hardware therefore need to be appropriate for the combined load, and the manufacturer’s stated capacity should never be exceeded.
The hammock should initially be installed without anyone inside it. Inspect the connection points, make sure the straps are properly positioned, and check that the hammock has an appropriate amount of sag. Then test the setup gradually with one person before introducing a second person.
A double hammock can also be comfortable when used alone because the extra width allows a diagonal lying position. This is one reason many people prefer double hammocks even when they rarely share them.
For backyard use, remember that leaving a hammock permanently outdoors can accelerate fabric and hardware wear. Taking it down after use or during severe weather can extend its useful life considerably.
At around $40–$60 depending on the configuration, this type of hammock provides a useful balance between space, portability, and affordability.
6. Best Choice Products Hammock with Stand — easiest option without trees
Best Choice Products Hammock with Stand is aimed at users who want to avoid the biggest limitation of traditional tree hammocks: needing two suitable trees in the right location.
A freestanding hammock changes the answer to how do you set up a hammock because the anchor points are built into the stand. Instead of measuring tree spacing and selecting appropriate trunks, you assemble the frame, attach the hammock, and adjust the suspension according to the stand’s design.
This can be particularly useful for apartments with patios, suburban backyards with few mature trees, or indoor/outdoor spaces where permanent tree straps are impractical. It also allows you to reposition the hammock whenever you want to change the layout.
The main consideration is the stand’s footprint. Unlike a portable tree hammock, a stand requires a reasonably level surface and enough space around it. You also need to inspect the frame and hardware periodically because bolts, joints, and connection points are now part of the suspension system.
A stand-based hammock can also be more predictable for beginners. Once assembled correctly, the geometry is largely determined by the frame, reducing some of the trial and error involved with tree setups.
At roughly $100–$150 depending on model and configuration, it costs more than a basic hammock and straps, but the convenience can justify the additional expense for users without suitable trees.
7. Vivere Universal Steel Stand — flexible solution for backyard placement
Vivere Universal Steel Stand is a strong choice when you already own a compatible hammock or want a dedicated structure that can be used without trees. The stand provides a controlled suspension environment and makes it easier to move the hammock around the property.
The biggest benefit is flexibility. If you change your mind about where the hammock should sit, you don’t need to locate another pair of suitable trees. You can reposition the stand as long as the new location provides a sufficiently level and stable surface.
When considering how do you set up a hammock on a stand, follow the stand manufacturer’s assembly instructions carefully. Check that every connection is secure before loading the hammock and make sure the hammock is compatible with the stand’s dimensions. A hammock that is too short or too long for a stand may not hang correctly even if the frame itself is assembled properly.
Steel stands also require occasional inspection. Look for rust, damaged welds, loose fasteners, or bent components, especially if the stand remains outdoors. Surface corrosion should be addressed according to the manufacturer’s maintenance instructions.
At around $100–$150, a universal stand is a useful long-term investment for backyard users who value convenience and location flexibility more than ultralight portability.
Your First 30 Minutes: How to Set Up a Hammock Correctly
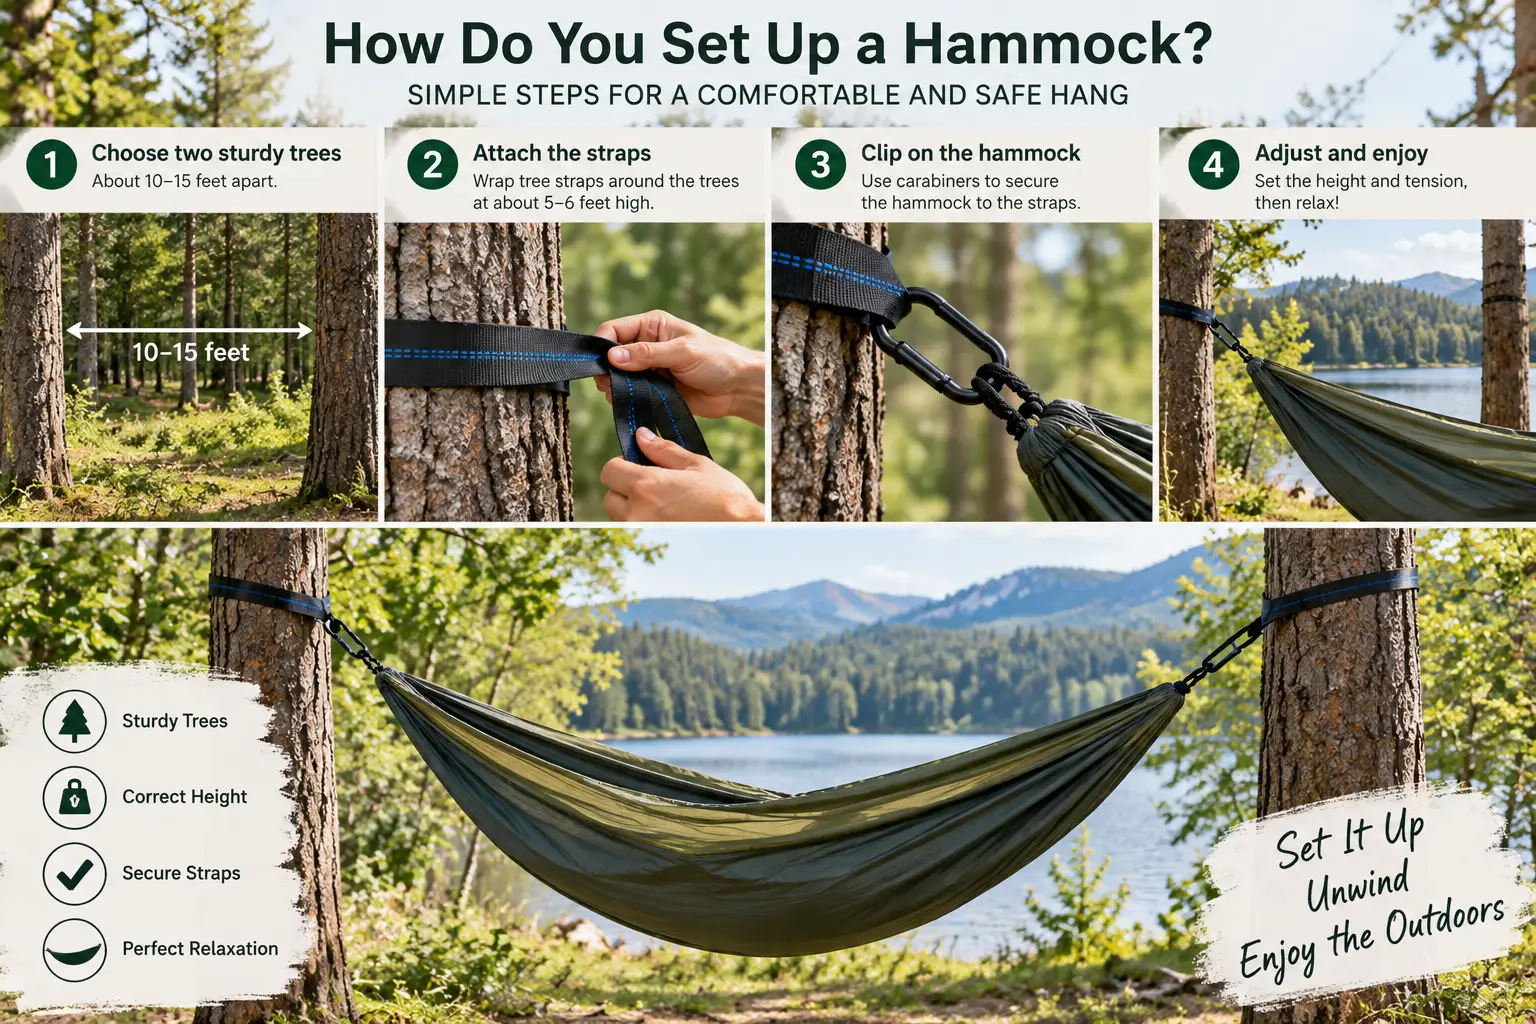
The first step is choosing your anchor points. For a tree setup, select healthy, mature trees with suitable trunks and avoid dead, damaged, or visibly unstable trees. The distance between the trees needs to be compatible with the length of the hammock and its suspension system.
Next, attach purpose-designed hammock straps at an appropriate height. Avoid tying complex knots unless the manufacturer specifically instructs you to do so. Modern hammock suspension systems often use loops, carabiners, or adjustable webbing because these make setup and adjustment easier.
Attach the hammock to both suspension points and inspect the connections before sitting down. The hammock should have a noticeable curve rather than being pulled completely tight.
For many recreational setups, a roughly 30-degree suspension angle is a useful starting point, but the exact geometry depends on the hammock and suspension system. The important thing is to make small adjustments rather than trying to force one universal measurement onto every hammock.
Sit gently in the hammock first. If it feels excessively high, adjust the straps downward. If the hammock sits too close to the ground once loaded, raise the suspension points or shorten the suspension system.
Never make major adjustments while fully loaded. Get out of the hammock, reposition the suspension, and test again.
Real-World Scenarios: Which Hammock Setup Fits Your Situation?
The first-time backyard user: A hammock with a simple adjustable suspension system is the easiest way to learn. Start with a low-risk setup between suitable trees and practice adjusting the sag until the position feels natural.
The apartment or small-yard user: A freestanding hammock stand eliminates the need for trees. The trade-off is that you need enough floor space and a stable, reasonably level surface.
The weekend camper: A lightweight portable hammock with compact straps is ideal because everything can fit inside a backpack and be installed temporarily.
The couple who wants to lounge together: A double hammock provides more surface area, but the combined weight makes checking the suspension rating especially important.
The long-term backyard user: A sturdy stand or properly installed hammock suspension system makes more sense than repeatedly improvising anchor points. Regular inspection and weather protection become more important when the hammock remains outside.
Common Hammock Setup Problems — and How to Solve Them
Problem: “My hammock feels too tight.” Solution: Lower the suspension points slightly and allow more natural sag. A hammock generally should not be stretched completely flat.
Problem: “The hammock is almost touching the ground.” Solution: Raise the attachment points or shorten the suspension system, then retest the hammock without anyone inside it.
Problem: “I don’t have two suitable trees.” Solution: Use a freestanding hammock stand instead of attaching the hammock to weak structures, fences, or improvised anchor points.
Problem: “The hammock keeps sliding toward one side.” Solution: Check whether both suspension points are at compatible heights and whether the straps are attached symmetrically.
Problem: “The hammock feels unstable when I sit down.” Solution: Get in slowly and keep your center of gravity low. Check the carabiners, loops, straps, and anchor points if the movement feels excessive.
Problem: “I don’t know whether the tree is strong enough.” Solution: Don’t guess. Choose another suitable tree or use a stand. The safest hammock setup is one where the anchor point is clearly appropriate for the intended load.
How to Choose the Right Hammock Setup
- Decide where you’ll use it. If you primarily camp or travel, choose a portable tree setup. If you’re staying in one backyard, a stand may be more convenient.
- Measure the available space. Before buying a hammock or stand, check the distance between potential anchor points and the manufacturer’s recommended setup range.
- Check the suspension system. Straps, carabiners, and attachment hardware are just as important as the hammock fabric itself.
- Consider total load. Account for the combined weight of everyone who may use the hammock, plus any movement that occurs during use.
- Choose adjustable suspension. Adjustable straps make it significantly easier to correct height and sag without complicated knots.
- Think about weather exposure. A hammock that stays outdoors needs appropriate fabric and hardware care, while a portable hammock can simply be removed and stored.
- Test before relaxing fully. Inspect every connection, apply weight gradually, and make adjustments before settling into the hammock for a long session.
Common Mistakes to Avoid When Setting Up a Hammock
The most common mistake is hanging a hammock too tightly. Beginners often believe that a straight, taut hammock looks safer, but excessive tension can place unnecessary forces on the suspension system and make the hammock less comfortable.
Another mistake is hanging the hammock too high. A hammock may appear low enough before you enter it, but the fabric and suspension will change position once loaded. Starting at a moderate height makes testing easier.
Using inappropriate anchor points is another serious problem. Deck railings, lightweight fence posts, small trees, decorative structures, or improvised hardware may not be designed to support dynamic hammock loads.
People also frequently ignore the condition of their straps. Webbing can degrade from UV exposure, moisture, abrasion, and repeated use. Inspect it regularly and replace damaged components rather than trying to repair them with makeshift knots or tape.
Finally, don’t assume that every hammock works with every stand. The dimensions and suspension geometry need to be compatible. Check manufacturer specifications before combining components from different systems.
Hammock Setup vs. Traditional Outdoor Seating
| Factor | Hammock | Chair/Lounge |
|---|---|---|
| Portability | Excellent with portable models | Usually moderate |
| Installation | Requires suspension or stand | Usually minimal |
| Comfort | Excellent for reclining | Good |
| Space efficiency | High when stored | Moderate |
| Two-person use | Available with double models | Depends on furniture |
| Best setting | Camping, backyard, travel | Patio, deck, indoor use |
The major advantage of a hammock is the combination of portability and reclining comfort. A portable hammock can disappear into a backpack when you’re finished using it, while a chair or lounge usually occupies a permanent footprint.
The trade-off is setup. A chair can normally be placed on the ground immediately, while a hammock requires a suitable suspension system or stand. That makes how do you set up a hammock an important consideration before buying one.
What to Expect: Comfort and Stability
A correctly installed hammock should feel supportive without feeling rigid. The fabric should form around your body, and you should have enough room to shift your position without feeling like you’re about to roll out.
Don’t expect the hammock to remain completely motionless. Gentle movement is part of the hammock experience. However, excessive swinging, twisting, or shifting can indicate that the suspension points are uneven or that the hammock is being loaded in a way the system wasn’t designed for.
You may also find that lying diagonally feels more comfortable than lying directly along the centerline. This spreads the fabric and can create a flatter resting surface.
Over time, you’ll probably develop your own preferred setup height and sag. That’s normal. The first installation is about learning the basic geometry; later setups become much faster because you know what feels comfortable.
Hammocks for Every Outdoor Space
There is no single correct answer to how do you set up a hammock because the ideal method changes according to the environment.
A campsite with two healthy trees naturally favors a portable hammock and adjustable straps. A backyard with no mature trees favors a stand. A large property with suitable trees may support a more permanent suspension system. A small patio may require a compact freestanding frame.
The key is matching the suspension method to the environment rather than forcing the environment to work with the hammock. This approach makes installation easier and reduces the temptation to use questionable anchor points.
Portable hammocks are particularly useful when flexibility matters. Stand-mounted hammocks make more sense when you want predictable placement. Double hammocks are useful for shared relaxation, while compact single hammocks are often better for backpacking.
Once you understand the fundamentals, changing between these configurations becomes much easier.
Long-Term Cost and Maintenance
The long-term cost of a hammock is not limited to the initial purchase. Suspension straps, replacement carabiners, stands, storage bags, and weather-related wear can all affect the total cost of ownership.
Portable hammocks are generally inexpensive to maintain because they can be removed and stored indoors after use. Keeping the fabric dry and away from unnecessary UV exposure can help extend its useful life.
Freestanding stands require more attention because they contain structural components. Check bolts, joints, welds, and protective finishes periodically. If the stand develops significant corrosion or structural damage, discontinue use until it has been properly evaluated or replaced.
Tree straps should also be inspected regularly. Look for fraying, cuts, stretched stitching, discoloration, or other signs of material degradation. Never assume a strap is safe simply because it worked the previous season.
A small amount of maintenance can prevent much larger problems later. The best hammock setup is one that remains reliable after dozens or hundreds of uses, not merely one that works perfectly on the first afternoon.
Safety, Regulations, and Standards
The most important safety principle when learning how do you set up a hammock is to treat the suspension system as load-bearing equipment. The hammock fabric may look strong, but the entire system depends on the anchor points, straps, carabiners, connection loops, and supporting structures.
Never attach a hammock to an object unless you are confident that the object is designed to withstand the expected load. Avoid damaged trees, dead branches, unstable posts, railings, or structures with unknown structural capacity.
For tree setups, purpose-designed wide webbing straps are generally preferable to narrow ropes that can concentrate pressure against bark. Follow the manufacturer’s instructions regarding acceptable anchor points and maximum loads.
Always check the manufacturer’s weight rating before use and remember that dynamic movement can place different forces on the suspension system than simply lying still.
If you’re using a hammock around children, supervise them and make sure they understand how to enter and exit safely. A hammock is not automatically a playground structure simply because it is made for outdoor relaxation.
For consumer-product safety information, the U.S. Consumer Product Safety Commission is a useful authoritative resource.
Features That Actually Matter (and Ones That Don’t)
Adjustable suspension is one of the most useful features because it allows you to correct height and sag without repeatedly retying knots. Strong, appropriately rated hardware matters more than decorative accessories.
Wide tree straps can also be valuable because they distribute contact over a larger area than thin cordage. A durable carry bag is useful for portable users, but it has little effect on the actual safety or comfort of the hammock.
The hammock’s weight rating is another critical specification. Don’t choose a model solely because it says “double” or “heavy duty.” Look for a clearly stated maximum load and make sure it matches the people who will use it.
What matters less is the number of included accessories if those accessories don’t improve the actual suspension system. Extra pockets, decorative details, and novelty features can be convenient, but they should never take priority over suitable materials, reliable attachment hardware, and appropriate load capacity.
The same principle applies to stands. A visually attractive frame is not necessarily a better frame. Stability, compatibility, dimensions, hardware quality, and surface suitability should come first.
✨ Ready to hang your hammock? Start with the anchor points, check every connection, and make small adjustments until the hammock sits securely and comfortably! 🌿
FAQs
❓ How do you set up a hammock between two trees?
❓ How high should a hammock be when setting it up?
❓ Can you set up a hammock without trees?
❓ Should a hammock be tight or loose when you set it up?
❓ How do you know if a hammock setup is safe?
Conclusion
Learning how do you set up a hammock is much easier once you stop thinking of the hammock as a piece of fabric that simply needs to be stretched between two points. The real system consists of the hammock, suspension straps, attachment hardware, anchor points, and the surface or structures supporting everything.
For camping and travel, a lightweight portable hammock with adjustable straps offers the fastest and most flexible setup. For a backyard without suitable trees, a freestanding stand removes much of the guesswork. Double hammocks are useful for shared lounging, while single models are often better for solo users who value portability.
The most important habits are consistent regardless of which hammock you choose: inspect your equipment, use appropriate anchor points, respect the manufacturer’s load rating, avoid excessive tension, and test the setup before fully committing your body weight.
Once you’ve found the right combination of suspension height and sag, hammock setup becomes a quick routine rather than a frustrating experiment. Take a few minutes to install it correctly, and you’ll have a much more comfortable and dependable place to relax.
Prices and availability can change, so check the current product specifications before purchasing. Most importantly, prioritize suspension quality and safe installation over decorative features or the lowest possible price.
✨ Ready to enjoy your hammock? Set it up carefully, adjust the sag, and create your perfect outdoor relaxation spot! 🌴😎
Recommended for You
- 7 Best Flat Bottom Hammock Picks for 2026 (Sleep Truly Flat)
- 7 Best Hammock Ideas Without Trees for 2026: Relax Anywhere
- 3 Point Hammock: 7 Best Triangle Picks for 2026
Disclaimer: This post contains affiliate links. As an Amazon Associate, I earn from qualifying purchases made through these links, at no additional cost to you.
✨ Found this article helpful? Share it with someone who wants to learn how to set up a hammock! 💬🌴