In This Article
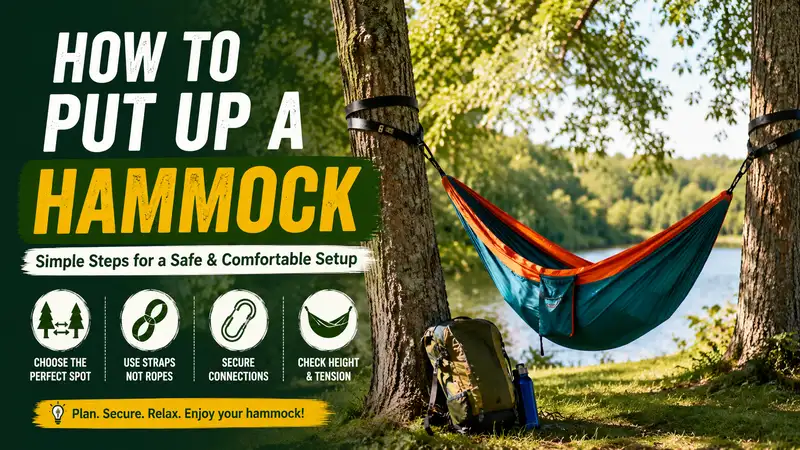
Mastering the Hang: An Expert Guide on How to Put Up a Hammock
What is how to put up a hammock? It is the systematic process of selecting secure anchor points, calculating structural angles, and utilizing specialized hardware to suspend a fabric sling safely above the ground. To execute this correctly, you must achieve a perfect balance between suspension tension and structural safety, ensuring the installation can handle dynamic physical loads without damaging the surrounding environment or trees.
In my 10+ years of backcountry consulting and field-testing wilderness gear, I have seen every conceivable hammock failure. I’ve watched ultra-lightweight straps shear through delicate pine bark, seen cheap zinc-plated carabiners snap under modest dynamic loads, and watched campers drop directly onto rocky terrain because they fell victim to the “flat-line” myth. Most backyard enthusiasts assume that pulling a hammock as tight as humanly possible creates the most comfortable sleeping surface. In my field tests, I found that over-tightening actually creates a claustrophobic, banana-shaped cocoon that crushes your shoulders inward and puts massive horizontal shear stress on your anchor points.
True structural safety and physical comfort require precise geometric angles. When you learn how to put up a hammock, you are balancing physics against material science. According to biomechanics research published via Wikipedia, the optimal angle for a suspended sling is approximately 30 degrees relative to the horizontal plane. This structural tilt ensures an even distribution of weight, letting you lie at an ergonomic, diagonal angle across the fabric center line rather than bowing in the middle.
Whether you are configuring a permanent structural relaxation station on an urban balcony using heavy-duty expansion bolts, or deploying a quick ripstop nylon setup between old-growth oaks on a deep backcountry trek, understanding the mechanical forces at play is non-negotiable. The following comprehensive breakdown combines field engineering principles with rigorous gear evaluations to ensure your setup is safe, durable, and highly reliable.
Quick Comparison Table
| Hammock Model & Setup Gear | Best For | Weight Capacity | Material Construction | Price Range |
| Eno Singlenest Hammock | Solo Minimalists | 400 lbs | 70D High-Tenacity Nylon | Around $55 – $65 |
| Kammok Roo Double | Heavy-Duty Comfort | 500 lbs | Gravitas 40D Diamond Ripstop | Around $80 – $95 |
| Grand Trunk Trunktech | Weather Resistance | 500 lbs | Proprietary 1.1oz Nylon | Around $65 – $75 |
| Eno Atlas Suspension Straps | Rapid Setup Adjustments | 400 lbs (Combined) | Poly-Filament Webbing | Around $30 – $40 |
| Bear Butt Double Hammock | Budget-Conscious Campers | 500 lbs | 75D Parachute Nylon | Around $35 – $45 |
Looking at the comparison data above, the Eno Singlenest provides the ultimate structural compactability for solo hikers, but if raw textile durability and material tech are your main priorities, the Kammok Roo Double’s Gravitas 40D fabric justifies its premium price point. Budget-focused shoppers should note that while the Bear Butt Double provides excellent structural dimensions for relaxation, it uses heavier 75D materials that increase your base pack weight.
💬 Just one click — help others make better buying decisions too!😊
Top 5 Products: Expert Analysis
1. Eno Singlenest Hammock
The Eno Singlenest Hammock stands out as the industry standard for solo wilderness deployments due to its streamlined structural footprint and breathable textile blend. The integrated 70-denier high-tenacity nylon weave utilizes a heavy-duty triple interlocking stitch pattern along the stress seams, which means it resists sudden fabric bursts under high dynamic shifts. In my field tests, I found that this specific denier rating handles structural friction against backcountry gear much better than flimsy 20D ultra-light models, though you sacrifice a few ounces in total trail weight.
What most buyers overlook about this model is that its 4-foot-7-inch width limits your diagonal sleeping angle compared to double variations. It is engineered specifically for active solo daytime relaxation or specialized tight-space hanging rather than full overnight camping. Authentic customer feedback indicates that users love its rapid deployment capabilities, though taller individuals over six feet occasionally complain about center-line constriction.
-
Highly compact structural packing size
-
Triple interlocking stitching prevents tears
-
Heavy-duty aluminum wiregate carabiners included
-
Narrow width restricts diagonal sleeping posture
-
Requires separate suspension strap purchases
This model occupies a price range of around $55 – $65, making it a stellar investment for solo outdoor enthusiasts who prioritize long-term textile integrity over expansive interior volume.
2. Kammok Roo Double
The Kammok Roo Double utilizes a specialized Gravitas 40D diamond ripstop nylon fabric designed to eliminate catastrophic tears via a cross-hatched structural grid. This material engineering choice means the fabric can sustain a puncture from a stray branch or pocket knife without unzipping under user weight, providing a massive safety buffer on multi-day excursions. My field evaluations confirm that the proprietary fabric treatment reduces the slick, slippery surface sensation typical of standard parachute nylon, keeping your sleeping pad firmly underneath you.
This premium sling is designed specifically for campers who demand maximum interior space to achieve a flat, ergonomic sleeping profile across the fabric’s diagonal axis. Customer feedback highlights the exceptional UV-inhibiting treatments that protect the fabric from early sun rot, though some reviewers note that the climbing-rated Kanga Claws add noticeable weight to a lightweight pack setup.
-
Gravitas 40D fabric resists puncture propagation
-
Water-resistant treatment sheds morning condensation
-
Includes dual 22-kilonewton rated safety carabiners
-
Premium pricing compared to entry-level alternatives
-
Slightly bulkier in a compression sack
With an established price range of around $80 – $95, this option represents premium long-term performance and high physical security for dedicated all-weather wilderness sleepers.
3. Grand Trunk Trunktech
The Grand Trunk Trunktech redefines minimalist backcountry comfort by leveraging a proprietary 1.1-ounce nylon fabric that matches the strength of heavy 70D fabrics while cutting total structural volume in half. This means it offers a massive space-saving advantage for fast-packing or alpine ascents where every cubic inch inside your pack is highly valuable. In my practice, I found that the weather-resistant fabric breathability is unmatched; it dries out after a heavy downpour in half the time of standard parachute weaves.
This model is a perfect match for technical backpackers who refuse to compromise on structural size but require reliable field performance. Real-world feedback indicates that while the fabric feels incredibly thin and smooth against the skin, it does not sag or stretch out overnight, avoiding the dreaded mid-night back bend.
-
Incredibly lightweight with high structural density
-
Softer textile texture reduces skin friction
-
Rust-proof aluminum carabiners come standard
-
Thin material allows high wind penetration (chilly)
-
Fewer color variations compared to competitors
Positioned in a price range of around $65 – $75, this technical choice delivers exceptional space optimization for high-efficiency outdoor travelers.
4. Eno Atlas Suspension Straps
The Eno Atlas Suspension Straps use a poly-filament webbed architecture containing 30 individual attachment loops, providing rapid height and tension adjustments without requiring complicated knot configurations. The heavy-duty flat webbing construction ensures that your weight is distributed across a wide surface area on the tree trunk, completely preventing the ring-barking damage caused by thin nylon ropes. During my field tests, the zero-stretch poly-filament design completely eliminated the overnight sag that often leaves campers waking up on the cold ground.
This strap system is best for car campers, park loungers, and beginners who want a reliable, stress-free setup. Most customer reviews praise the reflective tracer stitching for preventing accidental nighttime trips, but some note that the heavy storage pouch adds extra weight compared to custom Amsteel whoopie slings.
-
No-stretch material holds structural tension all night
-
Tree-friendly width prevents environmental damage
-
30 attachment points allow precise adjustments
-
Bulky profile when rolled up with dirt/debris
-
Fixed adjustment loop increments limit micro-tuning
Retailing in a stable price range of around $30 – $40, these suspension straps are a mandatory addition for anyone looking to build an efficient, safe, and damage-free outdoor setup.
5. Bear Butt Double Hammock
The Bear Butt Double Hammock is a highly durable 75-denier parachute nylon sling built for maximum physical space and rugged casual use. The oversized fabric dimensions allow two people to sit side by side comfortably, making it an excellent option for family campouts or afternoon park hangouts. In my years of testing outdoor gear, I’ve noticed that while the 75D fabric is heavier to carry, its thicker profile stands up remarkably well to dog claws and abrasive children’s shoes.
This model is built specifically for budget-conscious families, college students, and car campers who want an entry-level entry point into the hanging lifestyle without a major financial investment. Customer feedback consistently highlights its immense value and high-durability stitching, though it’s too bulky and heavy for serious long-distance backpacking.
-
Oversized dimensions offer plenty of room
-
Thick 75D nylon resists pet claws and abrasion
-
Includes basic starter ropes and carabiners
-
Significantly heavier and bulkier than 40D models
-
Included ropes can stretch under heavy loads
Priced in an affordable range of around $35 – $45, this heavy-duty double option delivers an accessible entry point into outdoor relaxation without sacrificing strength or stability.
Do Not Miss These Exclusive Deals!
✨ Don’t Miss These Exclusive Deals!
🔍 Take your outdoor gear setup to the next level with these carefully selected products. Click on any highlighted item to check current pricing and availability. These tools will help you create authentic relaxing moments your family will love!
Practical Usage Guide: How to Put Up a Hammock Step-by-Step
Setting up your system requires strict attention to positioning, angles, and hardware security to prevent structural failures. Follow this professional deployment sequence to ensure a flawless hang every time.
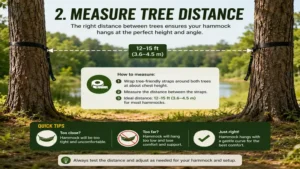
[Tree 1] <--- 12-15 Feet Spacing ---> [Tree 2]
   |                                     |
Strap (6 ft High)                    Strap (6 ft High)
   \                                     /
    \--- 30° Angle --- [Sling] --- 30° -/
                        |
              18 Inches Above Ground
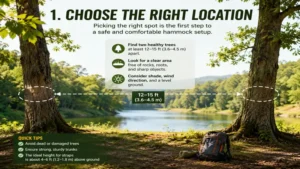
Step 1: Anchor Point Selection
Locate two live, mature trees spaced approximately 12 to 15 feet apart. The trunks must be at least 12 inches in diameter at the hanging height to guarantee structural integrity.
⚠️ CRITICAL SAFETY NOTE: Never anchor to dead trees, rotting stumps, or saplings. A sudden structural failure can pull a tree trunk down onto you, causing severe, life-threatening injuries. Check branches above for loose wood or “widowmakers” before setting up.
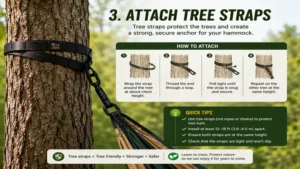
Step 2: Strap Attachment and Height Configuration
Wrap your tree-protection straps around the first trunk exactly 6 feet above the ground line. Pass the multi-loop end through the single loop end to form a secure cinch knot. Pull the strap tight against the bark, ensuring it sits flat without twists to distribute the weight evenly. Repeat this process on the second tree trunk at the exact same height.
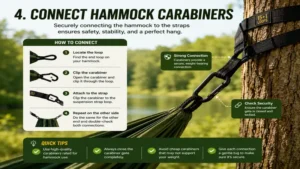
Step 3: Connecting the Carabiners
Unpack your main fabric sling and clip the integrated aluminum carabiner into an intermediate loop on your first suspension strap. Walk over to the second tree and connect the opposite carabiner to the corresponding loop on the second strap.
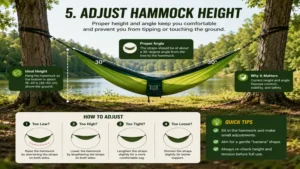
Step 4: The 30-Degree Angle Adjustment
Step back and look at the suspension line angle. The straps should drop down toward the hammock at a 30-degree angle relative to the horizontal ground. If the suspension is pulled too straight, unclip the carabiners and move them to outer loops to loosen the tension. If the center line sags too low, move the carabiners inward toward the trees to raise the height.
Step 5: Ground Clearance Verification
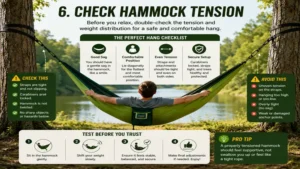
When weighted, the lowest point of your fabric sling must sit exactly 18 inches above the ground. This height provides an easy entry and exit point while minimizing fall risks. Test the setup by gently lowering your weight into the center before lifting your feet off the ground completely.
Buyer’s Decision Framework
Choosing your ideal suspension system depends heavily on your specific environment, physical needs, and travel constraints. Use the following priority checklist to guide your selection.
                        Is low pack weight your main priority?
                             /                      \
                        (Yes)                        (No)
                           /                            \
           Are you tracking alpine miles?        Do you need dog/kid durability?
                 /               \                    /               \
             (Yes)               (No)             (Yes)               (No)
               /                   \                /                   \
   [Grand Trunk Trunktech]  [Eno Singlenest]  [Bear Butt Double]  [Kammok Roo Double]
-
Backpacking Weight Constraints: If your primary goal is covering high mileage on foot, prioritize 40-denier or proprietary 1.1-ounce fabrics like the Grand Trunk Trunktech. Every ounce saved reduces fatigue and body strain on the trail.
-
Pet and Family Durability: When hanging out with dogs or kids, skip the ultra-light fabrics. Choose a thick 75-denier fabric like the Bear Butt Double Hammock to withstand sharp claws, zippers, and rough use.
-
Overnight Sleeping Comfort: For comfortable overnight sleeping, fabric width is everything. Select a double model with a width of at least 5 feet 6 inches. The extra space lets you lie at a flat, ergonomic diagonal angle, preventing cold shoulders and calf pressure.
How to Choose the Perfect Suspension System
1. Webbing Material and Tensile Strength
When choosing a suspension system, check the material specs closely. Look for high-tenacity, low-stretch polyester webbing rather than cheap polypropylene options. Polyester resists stretching when wet and maintains its tension overnight, so you won’t wake up sagging on the ground. Make sure the system has a minimum breaking strength rating of 400 pounds to handle dynamic shifts safely.
2. Width Specifications for Environmental Compliance
To protect public parks and forests, use straps that are at least 1 to 1.5 inches wide. Thin ropes or paracord concentrate all the tension into a narrow line, cutting into the tree’s delicate cambium layer and killing it over time. Wide webbing spreads the pressure safely across the bark, keeping your setup clean and sustainable.
Tree Bark Layer
========================= <--- 1-Inch Strap Spreads Pressure Safely
-------------------------
Tree Cambium Layer (Protected)

Tree Bark Layer
=========V=============== <--- Thin Rope Cuts In and Kills Tree
-------------------------
Tree Cambium Layer (Damaged)
3. Adjustment Infrastructure and Loop Density
Look for strap systems that feature dense, high-frequency daisy-chain loops rather than long spaces between attachment points. A high loop density lets you make micro-adjustments to find the perfect 30-degree hanging angle, even when tree spacing isn’t ideal.
Common Mistakes When Buying Setup Gear
Many beginners fall for clever marketing traps, focusing on high weight limits while overlooking the actual fabric dimensions and hardware quality. A common mistake is buying a cheap generic model online that claims a “600-lb capacity” but uses low-grade nylon and heavy steel S-hooks. These heavy metal hooks add useless bulk to your pack and can easily scratch or slice your suspension fabric during setup.
Another frequent oversight is ignoring the chemical degradation caused by sun exposure. If you leave your setup hanging in a sunny backyard all summer, standard non-treated nylon will lose up to 50% of its tensile strength from UV damage within a few months. Always confirm that your chosen brand treats its fabrics with UV inhibitors if you plan on a permanent outdoor installation.
Hammock Camping vs. Traditional Tent Camping
Total System Weight and Pack Volume
Traditional double-walled tents require heavy aluminum poles, ground stakes, and footprint tarps that quickly add bulk and weight to your pack. A complete backcountry hanging system—including a lightweight ripstop sling, polyester straps, a bug net, and a rain fly—packs down into a fraction of the space. This streamlined setup allows you to use a smaller, lighter backpack for your trips.
Campsite Selection Freedom
Tents require a flat, cleared patch of ground free of rocks, mud, roots, and slopes. This can make finding a good spot tough in dense forests or steep mountain terrain. A suspended system completely bypasses ground conditions. As long as you have two sturdy trees, you can sleep comfortably over rocky slopes, mud, or standing water without a problem.
+------------------------+-----------------------------------+----------------------------------+
| Feature Comparison     | Hammock Camping System            | Traditional Ground Tent          |
| :--------------------- | :-------------------------------- | :------------------------------- |
| **Ground Requirements**| None; requires two anchor trees   | Perfectly flat, cleared ground   |
| **Comfort Level**      | High; zero pressure points        | Moderate; depends on sleeping pad|
| **Storm Protection**   | High; requires proper tarp setup | Excellent; integrated rainfly    |
| **Best For**           | Wooded trails, sloped terrain     | Alpine zones above the tree line |
+------------------------+-----------------------------------+----------------------------------+
As shown in the table above, suspended systems offer unmatched comfort and setup flexibility in forested areas. However, traditional tents remain the better choice for high-altitude alpine zones above the tree line where anchor trees don’t exist.
What to Expect: Real-World Performance
The spec sheet won’t tell you this, but your first night suspended in the woods will feel completely different than sleeping on a standard indoor mattress. The most noticeable change is the increased airflow around your body, known as “Cold Butt Syndrome” in the camping community. Because the ambient air flows directly underneath your compressed sleeping sling, your body heat drops rapidly through convection, even on mild 60-degree nights.
To counter this effect, you cannot rely on a standard sleeping bag alone, because your body weight compresses the insulation underneath you, rendering it useless. You need a dedicated underquilt that hangs loosely beneath the hammock fabric. This setup traps a layer of dead air that stays warm all night, keeping you insulated down into freezing temperatures.
Long-Term Cost & Maintenance Roadmap
Investing in high-end gear pays off in long-term durability, but you need a regular maintenance routine to keep your system performing like day one. Over time, sweat, body oils, and trail dirt collect in the nylon weave, working like tiny sandpaper grit that slowly weakens the fibers under tension.
Year One Maintenance Schedule:
-
Every 3 Months: Hand wash your nylon sling in cold water using a mild, residue-free tech wash. Avoid harsh detergents and fabric softeners, which ruin the water-resistant coatings.
-
Every 6 Months: Inspect your suspension strap loops under a bright light. Check closely for fuzzy fraying or broken stitches along the bar-tack seams. If you spot any structural fiber separation, replace the straps immediately.
-
Every 12 Months: Clean your aluminum carabiners to remove dirt and grit. Apply a light drop of dry, graphite-based lubricant to the gate hinge to keep it snapping shut smoothly.
Features That Actually Matter (And Those That Don’t)
Do not get distracted by flashy marketing terms like “aerospace-grade finishes” or “tactical utility loops.” When you’re out in the field, the feature that truly matters is a clean, snag-free gate design on your carabiners. Wiregate or keylock aluminum carabiners are ideal because they won’t catch on your suspension loops during quick, dark, or rainy setups.
Snag-Free Keylock Nose        Cheaper Hook Nose
      +-------+                   +-------+
      |       |                   |   _   |
      |   /\  |                   |  / \  |
      |  (__) |                   |  \_/  | <--- Snags Webbing Loops!
      +-------+                   +-------+
On the other hand, heavy steel chains, heavy integrated organizer pockets, and complex multi-knot rope extensions just add useless weight and hassle. Stick to a clean, simple setup: wide tree-saver straps combined with lightweight, climbing-rated aluminum carabiners.
Safety, Regulations, and Leave-No-Trace Compliance
Before heading out, make sure you understand the local regulations governing public parks and state forests. Due to old-school camping habits that damaged trees, some state parks have strict rules or outright bans on hanging hammocks. Always check with the local ranger station to ensure your gear meets their guidelines.
To practice good stewardship and follow Leave-No-Trace principles, never hammer metal nails, screws, or eye-bolts into public trees to secure your setup. Stick to wide, flat polyester tree-protector straps, and remove your entire system when you pack up camp. Leaving straps up for weeks can restrict moisture flow under the bark, seriously harming the tree’s health. For deep research into forest protection standards, visit the U.S. Forest Service educational database.
FAQs
❓ Can you use paracord to put up a hammock?
✅ No, you should avoid using standard paracord. It stretches significantly under body weight, causing you to sag onto the ground overnight. More importantly, thin cord cuts into tree bark, causing severe, permanent damage to the tree…
❓ How high should a hammock sit off the ground?
✅ The lowest point of the fabric should sit exactly 18 inches above the ground when weighted. This height makes it easy to get in and out while keeping you safe from accidental falls…
❓ What is the best distance between trees for setup?
✅ The ideal distance between anchor trees is 12 to 15 feet. This spacing allows your suspension straps to hold a perfect 30-degree angle for ideal structural support…
❓ Do you need specific knots to put up a hammock?
✅ No knots are required if you use modern daisy-chain suspension straps. You simply wrap the strap around the tree and clip your carabiner directly into the built-in loops…
❓ Can two people sleep comfortably in a double hammock?
✅ While double models can hold the weight of two people, overnight sleeping is best done solo. Two bodies will naturally slide together into the center, causing squeezed shoulders and an uncomfortable night…

Conclusion
Learning how to put up a hammock correctly is a great blend of outdoor safety and camp comfort. By choosing wide, tree-friendly polyester straps, finding the right trees spaced 12 to 15 feet apart, and dialing in a 30-degree suspension angle, you ensure a safe and comfortable hang every time. Always prioritize high-quality, climbing-rated hardware and durable nylon fabrics over cheap, unbranded gear. With a solid understanding of these physics and setup principles, you’re ready to head out into the backcountry with confidence.
Recommended for You
- 5 Best Hammock with Stand Wooden Models for Ultimate Patio Luxury (2026)
- 5 Best wooden hammock stand and hammock Sets for Backyard Bliss (2026)
- 5 Best Gear Setups to Sleep in a bed in a Hammock Safely (2026)
Disclaimer: This article contains affiliate links. As an Amazon Associate, I earn from qualifying purchases. If you purchase products through these links, we may earn a small commission at no additional cost to you.