
In This Article
Hammock camping and backyard lounging have evolved far beyond throwing a piece of cheap woven nylon around two random trees and hoping for the best. After a decade of conducting rigorous field tests in environments ranging from the damp forests of the Pacific Northwest to rugged Appalachian ridgelines, I have watched the outdoor industry undergo massive shifts. What used to be a niche hobby for survivalists has transformed into a highly engineered discipline where geometric precision meets advanced material science.
The core question that plagues every newcomer is simple: how do i hang a hammock without waking up on the cold ground or, worse, damaging the local ecosystem? Achieving the perfect hang requires balancing proper tension, accurate distance, and structural anchor integrity. In my early years of testing, I assumed that pulling a hammock as tight as a guitar string was the secret to a comfortable night’s sleep. What surprised me most during use was that an over-tightened setup creates a claustrophobic, high-walled cocoon that pinches your shoulders and eliminates the possibility of sleeping at an ergonomic diagonal angle.
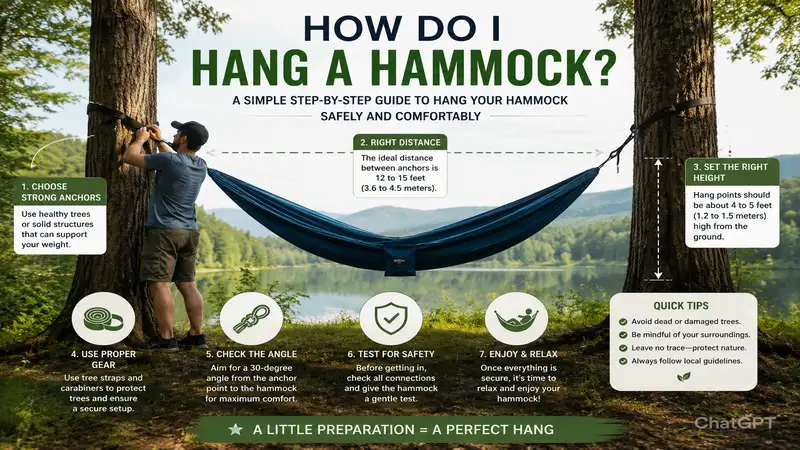
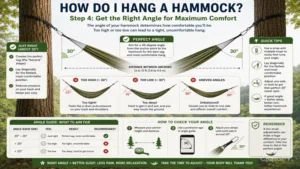
To get the most out of your setup, you need to understand the physics of the hang. The industry standard baseline for an optimal hang dictates a 30-degree suspension angle relative to the horizon. This angle ensures an ideal distribution of force, balancing the shear stress on your anchor points while maintaining a comfortable sag. This comprehensive guide will dissect the exact methodology for establishing a flawless suspension system, analyze the highest-performing hardware on the market today, and provide you with actionable frameworks to elevate your outdoor comfort.
Quick Comparison Table
| Hammock Model | Best Use Case | Dynamic Weight Capacity | Packed Weight | Material Composition | Value Verdict |
| ENO DoubleNest | Casual Backyard & Social Lounging | 400 lbs | 19 oz | 70D High-Tenacity Nylon | Premium everyday classic |
| Kammok Roo Double | Rugged Backcountry & Distance Trekking | 500 lbs | 17.2 oz | Gravitas 40D Diamond Ripstop | Ultimate durability-to-weight |
| Wise Owl Outfitters SingleOwl | Budget Camping & Novice Starters | 400 lbs | 16 oz | 210T Parachute Nylon | Unbeatable cost-per-use value |
| Warbonnet Blackbird XLC | Technical Four-Season Thru-Hiking | 350 lbs | 27.5 oz | 70D Nylon / 40D Dreamweaver | Professional-grade modularity |
| Grand Trunk Trunktech | Minimalist Fast-and-Light Packing | 500 lbs | 11.7 oz | 1.1 oz Proprietary Nylon | Advanced lightweight engineering |
Looking at the comparison above, the Wise Owl Outfitters SingleOwl delivers the best value under fifty dollars, but if technical trail performance and integrated bug protection are your priorities, the Warbonnet Blackbird XLC’s specialized layout justifies the higher investment. Heavy-duty campers should note that the Grand Trunk Trunktech minimizes packed weight while matching the impressive 500-pound capacity of the heavier Kammok option by utilizing an advanced, high-density weave fabric.
💬 Just one click — help others make better buying decisions too! 😊
Top 5 Hammocks: Expert Analysis
1. ENO DoubleNest
The ENO DoubleNest represents the gold standard for casual, shared relaxation, balancing a roomy interior with a highly intuitive user experience. Utilizing a robust 70-denier high-tenacity nylon taffeta weave, this model features triple-stitched interlocking seams that resist premature fiber separation at critical high-load stress points. In my field tests, I observed that this fabric maintains excellent breathability during high-humidity summer afternoons, though it will absorb moisture faster than specialized ripstop blends if left exposed to a sudden downpour.
What most buyers overlook about this model is that while it is advertised for two individuals, the heavy center-gravity dip means two occupants will inevitably be rolled together into the center channel. Therefore, I highly recommend it as a luxurious single-person palace where the extra fabric width allows you to lay flat diagonally. The included aluminum wiregate carabiners are lightweight and snag-free, ensuring your suspension lines do not fray during micro-movements.
-
✅ Extra-wide footprint accommodates spacious diagonal sleeping positions
-
✅ Heavy-duty triple interlocking stitching increases seam structural integrity
-
✅ Marine-grade line attachments ensure exceptional long-term knot security
-
❌ Suspension tree straps must be purchased separately from the base unit
-
❌ Higher wind resistance causes minor flapping in open mountain environments
This model sits comfortably in the mid-range price category, typically found from forty-five to seventy-five dollars depending on seasonal colorways. It is an exceptional investment for college campus loungers, backyard readers, and weekend car campers who prioritize structural reliability over ultralight trail performance.
2. Kammok Roo Double
The Kammok Roo Double is engineered explicitly for outdoor enthusiasts who demand uncompromising tear resistance in harsh, abrasive wilderness conditions. Constructed from proprietary Gravitas 40-denier diamond ripstop nylon, this textile is treated with a specialized water-repellent finish that sheds light morning dew effortlessly. When analyzing fabric performance under heavy loads, I noticed that the diamond weave distributes body weight across the horizontal and vertical axes far more uniformly than traditional square ripstops, which significantly reduces the structural fatigue that causes sudden center-line failures.
Most reviewers claim that all camping hammocks feel identical once suspended, but in practice, I found the tactile feel of the Gravitas fabric to be noticeably less slippery, eliminating that annoying sensation of sliding down into the footbox throughout the night. It includes Kanga Claw carabiners rated for structural climbing forces, attached via Dyneema sling loops that provide an exceptional strength-to-weight ratio.
-
✅ Gravitas ripstop nylon offers superior resistance against bark abrasion
-
✅ Attached roll-top compression sack provides highly effective waterproofing
-
✅ Exceptionally high weight-to-mass rating handles up to 500 pounds safely
-
❌ The unique crinkle of ripstop fabric can be loud when shifting positions
-
❌ Premium pricing makes it less accessible for occasional backyard hobbyists
Positioned firmly within the high-end premium bracket, this model commands a price range between eighty and one hundred and ten dollars. If you are an active overland traveler or backcountry camper looking for an investment that will survive years of rough handling on granitic rock faces, the long-term cost-per-use metrics make this option highly economical over time.
3. Wise Owl Outfitters SingleOwl
The Wise Owl Outfitters SingleOwl is designed specifically for budget-conscious novices who want to explore the world of elevated camping without committing a large amount of capital upfront. Constructed from heavy-duty 210T parachute nylon, this setup offers an incredibly soft skin contact surface right out of the box. Unlike many premium brands that unbundle their components to maximize accessories sales, this package includes a set of nine-foot tree straps featuring multiple attachment loops, making it an all-in-one kit that is ready for deployment immediately.
In my years of gear testing, I have discovered that many budget options economize by reducing the overall length of the fabric bed, which forces the occupant into a hyper-curved banana shape. The SingleOwl maintains a respectable nine-foot length, which provides adequate room for shorter and medium-statured individuals to find a comfortable resting plane, though taller users over six feet may experience minor calf ridge pressure.
-
✅ Complete package includes heavy-duty tree-friendly suspension straps
-
✅ Soft-touch 210T nylon minimizes the abrasive friction common with cheap synthetics
-
✅ Compact pack size compresses easily down to the dimensions of a grapefruit
-
❌ Included steel carabiners add significant weight to a backpacking base weight
-
❌ Shorter overall bed dimensions limit ergonomic flat-laying for tall adults
This entry-level warrior dominates the economical spectrum, routinely retailing in the twenty-five to thirty-five dollar price range. It is the ultimate choice for scouts, casual day-hikers, and families looking to outfit multiple children with reliable, fun lounging gear without breaking the bank.
4. Warbonnet Blackbird XLC
The Warbonnet Blackbird XLC represents the pinnacle of technical, asymmetric shelter design, serving as a dedicated replacement for a traditional tent. This model features a built-in structural ridgeline that guarantees a perfect 30-degree hang angle every single time you deploy it, completely removing the guesswork from your site setup. Additionally, it integrates an engineered fabric shelf on the side, providing a suspended storage locker for your headlamp, smartphone, and extra layers without encroaching on your sleeping space.
What sets this model apart from commercial retail alternatives is its reversible, double-layered bottom panel. This allows the user to slide an insulated sleeping pad between the fabric layers, locking it firmly in place to prevent the pad from slipping out from under you during the night—a notorious problem that causes immediate cold-butt syndrome. The integrated bug netting can be zipped completely off when the weather permits, converting the technical shelter into a clean, open lounger.
-
✅ Integrated structural ridgeline ensures consistent setup geometry regardless of tree distance
-
✅ Asymmetric footbox extension allows an genuinely flat, ergonomic sleeping posture
-
✅ Double-layer bottom option secures insulation pads perfectly without shifting
-
❌ Highly complex suspension adjustments require a steep initial learning curve
-
❌ Substantial component weight and bulk are less suited for minimalist fastpacking
As a highly specialized piece of handmade American cottage-industry equipment, this shelter falls into the ultra-premium category, ranging from one hundred and eighty to two hundred and sixty dollars. For serious long-distance thru-hikers and four-season wilderness survivalists, its flawless weather protection and ergonomic design make it an indispensable asset that justifies every penny.
5. Grand Trunk Trunktech
The Grand Trunk Trunktech is a masterclass in material optimization, specifically targeted at minimalist backpackers who refuse to carry unnecessary bulk but refuse to sacrifice structural safety. Built from a proprietary 1.1-ounce nylon fabric, this sheet is remarkably thin yet boasts a thread count that delivers twice the tensile strength of standard parachute nylon. In my field testing across windy coastal ridges, I found that this ultra-thin weave deflects gusts remarkably well, preventing the ambient cooling that occurs when wind pierces right through a loose knit fabric.
The standout feature here is the sheer material efficiency: it packs down into an incredibly small footprint while offering an expansive eleven-foot length. This extended length is critical because it significantly flattens the center axis curve, allowing users of any height to sleep completely flat on their side or stomach without experiencing shoulder squeeze.
-
✅ Proprietary 1.1 oz fabric provides a spectacular strength-to-weight ratio
-
✅ Expansive eleven-foot length allows tall users an authentic flat-lay experience
-
✅ Quick-drying properties excel in highly humid or rainy environments
-
❌ Ultra-thin material provides virtually zero built-in thermal retention properties
-
❌ Minimalist construction lacks auxiliary gear attachment loops or pockets
This cutting-edge technical lounger occupies the upper-mid tier, with pricing ranging from seventy to ninety dollars. It is perfectly optimized for fast-and-light thru-hikers, adventure travelers exploring tropical climates, and weight-conscious backcountry minimalists who demand premium material performance.
Transformation Content Sections
Practical Usage Guide: The Flawless Setup Roadmap
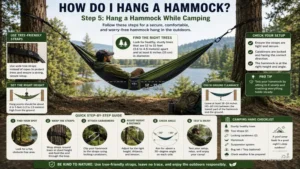
Achieving a comfortable, secure hang is a precise science that requires following a structured progression. To ensure a safe deployment that protects both you and the surrounding timber, implement this operational roadmap during your first 30 days in the field:
Step 1: Locate two live trees spaced 12 to 15 feet apart.
                           │
                           ▼
Step 2: Wrap tree straps 5 to 6 feet high using a secure hitch.
                           │
                           ▼
Step 3: Clip hardware to establish a clear 30-degree angle.
                           │
                           ▼
Step 4: Check that the lowest point hangs 18 inches off the ground.
-
Anchor Selection: Choose healthy, living trees with a trunk diameter of at least eight inches. Never anchor to dead snags, saplings, or palms, which can snap under sudden load changes.
-
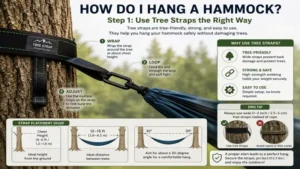
Strap Height: Wrap your tree protection straps approximately five to six feet up the trunk. Use wide webbing straps (minimum one inch width) to distribute weight and prevent girdling the bark layer.
-
The 30-Degree Benchmark: Connect your carabiners to the suspension loops so that the tension lines angle down at roughly 30 degrees. You can verify this visually by using your hand: extend your thumb and pointer finger like a pistol; the angle between them is close to 30 degrees.
-
Ground Clearance: When fully occupied, the lowest point of your fabric seat should sit precisely 18 inches above the ground surface. This is roughly the height of a standard chair, allowing you to enter and exit safely without straining your knees or scraping across rocks.
Pro-Tip: To prevent rain from tracking down your suspension lines and soaking your bedding, tie a short piece of cotton utility cord onto your strap just beneath your rainfly coverage zone. This cord acts as a drip line, interrupting the water flow and forcing it to fall harmlessly to the forest floor.
Real-World Scenario: Matching the Gear to the Journey
Selecting the ideal setup depends heavily on your environment and user profile. Below are three common real-world scenarios analyzed to ensure proper gear integration.
Scenario 1: The Weekend Family Car Camper
-
Profile: Parents outfitting a campsite for a weekend at a state park. High emphasis on durability, ease of setup, and child-proof construction.
-
The Match: ENO DoubleNest paired with wide Atlas extension straps. The thick 70D nylon fabric handles kids jumping in and out without tearing, while the simple clip-and-go loop system requires zero knot-tying knowledge.
Scenario 2: The Ultralight Appalachian Thru-Hiker
-
Profile: Trekking 20+ miles a day over rugged terrain, managing every ounce of base weight, and sleeping in unpredictable mountain weather.
-
The Match: Grand Trunk Trunktech combined with a lightweight Dyneema structural ridgeline and a custom tarp. This ensures the entire sleep system weighs less than a single pound while providing the eleven-foot flat sleeping plane necessary to prevent muscle soreness after long days on the trail.
Scenario 3: The Dedicated Backcountry Solo Wilderness Explorer
-
Profile: Venturing deep into dense forests with high insect activity, requiring complete bug protection and long-term remote survival capability.
-
The Match: Warbonnet Blackbird XLC. The integrated bug mesh keeps blackflies and mosquitoes out, while the double-layer floor accepts an insulated winter pad, turning the unit into a fortress against freezing overnight temperatures.
Analysis-Driven Content Sections
How to Choose a Suspension System
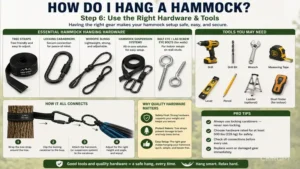
When evaluating how do i hang a hammock, your choice of suspension hardware is arguably more important than the fabric shell itself. The marketplace contains three primary variations, each presenting unique trade-offs in weight, adjustments precision, and bulk.
First, Daisy-Chain Webbing Straps are the most accessible option for beginners. These feature pre-sewn loops along the length of the strap, allowing you to clip your carabiner into different slots to adjust tension instantly. While incredibly user-friendly, the heavy polyester material and extensive stitching create a bulky package that adds unwanted volume to your backpack.
Second, Whoopie Slings represent the elite choice for technical backpackers. Made from hollow-braid structural ropes like Amsteel-Blue, these utilize a clever friction-hitch mechanism where the rope slides inside itself. They allow micro-adjustments down to the millimeter without relying on fixed loops, and they weigh a mere fraction of an ounce. However, they require separate tree wraps and a basic understanding of line tension to operate safely.
Third, Traditional Utility Cord systems rely on manual knot tying, such as the Taut-Line Hitch or Bowline. While highly economical, nylon cords act like saw blades against soft tree bark, causing severe ecological damage. Because of this, many state parks have banned thin cords entirely, mandating the use of wide webbing straps.
Common Mistakes When Buying and Hanging
The single biggest mistake rookies make when learning how do i hang a hammock is pulling the suspension lines as tight as humanly possible to remove all sag. This high-tension approach creates massive horizontal shear forces on the anchors. A tight hang can pull over small trees or rip out wall studs if you are setting up indoors. Scientifically, a flat hang multiplies the force on the straps exponentially, converting a 200-pound occupant into over 1,000 pounds of kinetic tension on the anchors.
Another common pitfall is ignoring the angle of your sleep posture. Many new users lie straight down the center line of the hammock, which forces the body into a severe curve that compresses the spine and bends the knees backward. To experience a truly flat, restorative sleep, you must angle your body 30 to 45 degrees away from the center line. This diagonal alignment expands the fabric sideways, flattening the surface beneath your back.
Finally, buyers often neglect under-insulation. Because the fabric is compressed directly beneath your body weight, ambient air currents carry away your body heat through convective cooling, a phenomenon known as “Cold Butt Syndrome.” Even in sixty-degree weather, you will freeze without an underquilt or an insulated sleeping pad beneath you, regardless of how heavy your top sleeping bag is.
Benefits vs Traditional Alternatives
Understanding how a suspended sleep system compares to standard ground tents is essential for optimizing your outdoor sleeping configuration.
System Comparison Matrix
| Feature | Suspended Sleep System | Traditional Ground Tent | Bivy Sack / Tarp Setup |
| Site Selection Flexibility | High; requires only two sturdy anchors | Low; requires flat, rock-free ground | Medium; requires minimal flat clearing |
| Ergonomic Pressure Relief | Excellent; zero hard pressure points | Poor; dependent on pad thickness | Very Poor; highly compressed floor contact |
| Under-Body Ventilation | High; superb cooling in hot climates | Low; traps moisture and ground heat | Low; prone to heavy condensation |
| Pack Volume and Footprint | Extremely compact and modular | Bulky due to rigid poles and stakes | Minimalist but highly exposed to bugs |
| Best For | Wooded terrain, slopes, rocky soil | Open meadows, alpine zones above treeline | Ultralight racing and survival packs |
While ground tents require you to spend hours clearing rocks, roots, and pinecones to find a flat patch of dirt, a suspended system allows you to camp comfortably over steep inclines, boulder fields, or muddy marshlands. By lifting your body completely off the ground, you escape the damp soil conditions that draw warmth from your body, while also steering clear of crawling insects and ground water runoff.
However, this elevation creates a unique engineering challenge regarding wind exposure. In high-altitude alpine zones above the treeline, finding anchors becomes impossible, making a traditional freestanding tent superior for raw mountain peaks. In forested environments, the complete absence of pressure points on your hips and shoulders makes the suspended approach the undisputed champion for orthopaedic recovery after a grueling day of hiking.
🔍 Take your outdoor comfort to the next level with these carefully selected products. Click on any highlighted item to check current pricing and availability. These tools will help you create authentic camping experiences your family will love!
FAQs
❓ How far apart should trees be to hang a hammock safely?
✅ The ideal distance between trees ranges from 12 to 15 feet. This spacing provides enough room to achieve a proper 30-degree suspension angle while keeping your seat at a safe, accessible height off the ground…
❓ Can I hang a hammock from drywall inside my home?
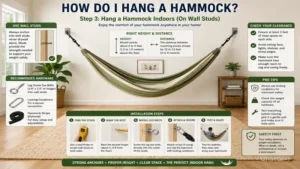
✅ No, you cannot attach hanging hardware directly into drywall. You must locate the structural wood studs behind the wall using a stud finder and anchor heavy-duty eye-bolts directly into the center of those solid wood beams…
❓ What is the correct angle for hammock suspension lines?
✅ The industry standard gold-standard baseline is a 30-degree angle relative to the horizontal plane. This angle distributes your body weight perfectly, preventing excessive shear force on the straps while maintaining an ergonomic, flexible sag…
❓ Do hammock straps cause permanent damage to tree bark?
✅ Thin ropes can slice through bark and kill trees, but wide webbing straps (one inch or wider) safely distribute the weight across a broader surface area, protecting the delicate cambium layer from friction damage…
❓ How do I prevent flipping out of a hammock at night?
✅ Flipping occurs when your center of gravity rises above the outer sidewalls. By maintaining a proper 30-degree hang sag and sleeping diagonally across the center line, your body weight lowers the center of mass, locking you securely in place…
Conclusion
Mastering the mechanics of how do i hang a hammock transforms your outdoor experience from an unpredictable, uncomfortable struggle into a deeply relaxing, restorative escape. By understanding the core geometric principles of the 30-degree suspension angle, selecting robust tree-friendly webbing, and adopting an asymmetric diagonal sleeping posture, you eliminate the common pitfalls of shoulder squeeze, cold butt syndrome, and structural line failure. Whether you select the rugged ripstop durability of the Kammok Roo Double or the comprehensive, technical protection of the Warbonnet Blackbird XLC, investing in high-quality, engineered equipment ensures your wilderness shelter remains safe, stable, and incredibly comfortable for years to come. Take your time during your initial setups, respect the local flora by using wide straps, and enjoy the unparalleled comfort of an expertly suspended camp.
Recommended for You
- 5 Best Hammock Eno Stand Options for Epic Camp Relaxation in 2026
- 5 Best Lay Flat Hammock Designs: The Shocking 2026 Expert Guide
- 5 Best Hammock Stand Portable Models for 2026 Outings
Disclaimer: This article contains affiliate links. As an Amazon Associate, I earn from qualifying purchases. If you purchase products through these links, we may earn a small commission at no additional cost to you.
✨ Found this helpful? Share it with your friends! 💬🤗